Draw Face Easy Steps How to Draw Mermaid Hair
In this easy step by step Mermaid Drawing tutorial you will learn how to draw a mermaid in 16 detailed steps. This other easy step-by-step Eye drawing tutorial will help you learn how to draw the face of your mermaid better.
The mermaid is one of the oldest and most popular mythical creatures. They appear in stories from all over the world as a half-fish, half-human creature.
You will see in my tutorials that I often draw each section of the picture separately. This means I can adjust each piece I draw individually.
I often trace the basic outlines as I draw and look at them in slightly different positions until I achieve the desired effect. Try it; it may help you learn how to draw the mermaid that you really want.
How to draw a mermaid
Step 1 – Starting Your Mermaid Drawing
To start drawing a mermaid, begin with the face. First, draw an oval with two lines forming a cross to split the circle into four equal parts. This will help you draw the proportions and structure of the mermaid's face.

Step 2 – Draw The Outline Of The Face
Draw the outline of the face with the eyes and mouth, but keep it simple for now. You can add all the details later.
Here I have drawn the face from the front so you can see both eyes, the nose, and the mouth. I will give the mermaid long flowing hair in this drawing, so the top of the face is cut to the shape of the fringe of the mermaid.

Step 3 – Remove The Guide Lines
Use an eraser to remove the guidelines and draw the shape of the mermaid's face properly now.
Learn how to draw in the shapes of the eyes and mouth to create the expression you want.
You can look here for ideas on our article about Drawing Facial Expression Ideas.
Step 4 – Draw In The Details
In step 4 of the mermaid drawing tutorial, you can add some detail. The face of the mermaid is what will bring the drawing to life.
Draw eyebrows and lashes to the eyes, remembering to draw the iris of the eyes where your mermaid is looking. Add the nose curves then, the shape will come from these simple lines and a slight shading.
Step 5 – Adding Shape
Now you have a reasonably full face for your mermaid drawing; you can add the shape. Do this by adding some shade. Use light shading lines and follow the curves of the face as you work around it.
Remember where the light source is and always draw in the shadows on the opposite side to the light source.
Step 6 – Flowing Hair
I always imagine a mermaid's hair as long and flowing, so I will draw it like that. Use your imagination; you can give your mermaid drawing any hairstyle you want to.

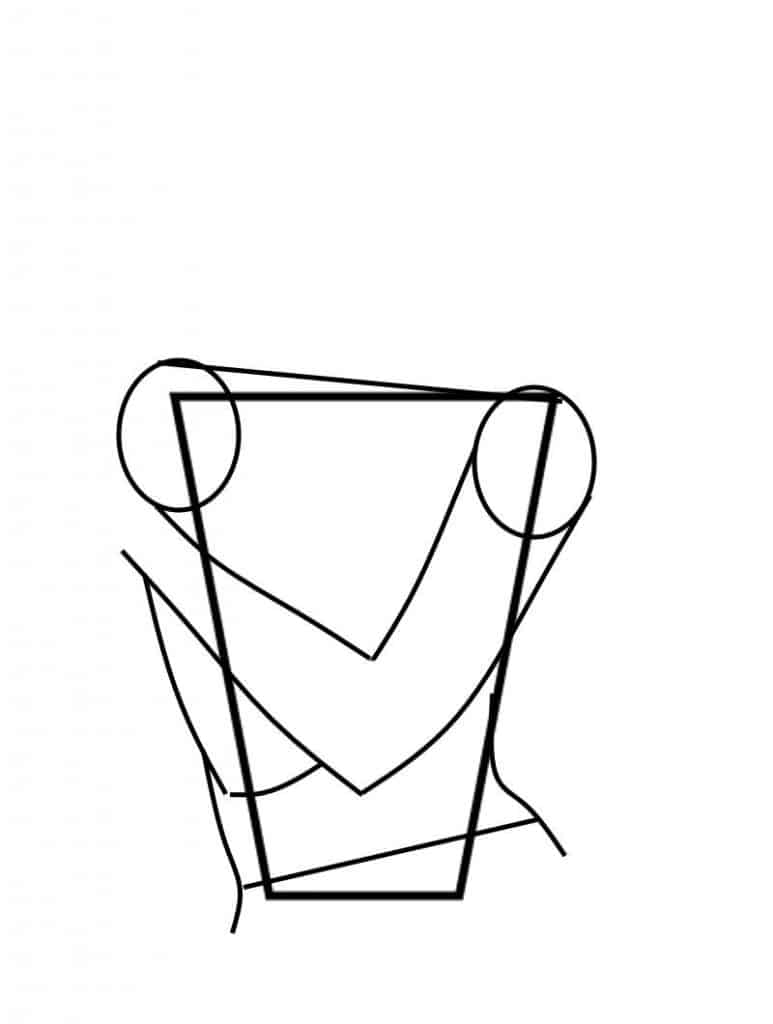
Step 7 – Body Shape
To draw the mermaid's body, draw a simple trapezoid to give you the rough shape of the upper body.

Think about the angle you are looking at the mermaid's body from and draw two lines to give you the position of the shoulders and waist. Then add two ovals for the shoulders.

Step 8 – Add Some Curves
Draw curves to give the body of your mermaid drawing shape and sketch in the arms.
Step 9 – Keep Things Natural
Carefully draw the hands, be careful to make sure they are in a natural position. Search online for hand drawings to give you some ideas if you need to.
Draw in the shoulders and other lines to help create the shape of the body.

Step 10 – Revealing Your Mermaid Drawing
Now is the time to get rid of your guidelines. Use a good eraser to leave the lines of your drawing while removing the shapes you used to help create the drawing.

Step 11 – Add More Detail
In this step, you can draw the finer detail of the hands and fingers. Then draw lines to define the collarbone, bust, and waist.
Add the darkest shading to help you create depth in your mermaid drawing.

Step 11 – Light And Shade
Add the lighter shading in this step. Think about the position of the light and run the shading along the arms and body to create a three-dimensional effect as you draw.

Step 12 – Learn How To Draw By Adding The Drawings Together
Now you can add the two parts of your drawing together. You can see now how the mermaid's hair falls gently over her shoulder.

Step 13 – Adding The Fish Tail
In step 13, we can add the tail to your mermaid drawing. Start by drawing two lines that give the shape of the tail itself. They should get slightly wider at the hips and then narrower towards the end.

Step 14 – The Fins
The fins give you a chance to add more character to your mermaid drawing. Search online for fishtails to give yourself some ideas. Look at how the fins flow and try to recreate that in your drawing.
Remember, the mermaid is a mythological creature, so there are no rules, really. You could add a single tail fin or multiple fins along the length of the tail.

Step 15 – The Scales
Remember, we are drawing a mermaid. Adding scales to the tail will add a fish-like essence to the drawing.
Scales can be any shape and size, and if you need to, a quick online search will give you plenty of ideas. As you add the scales, you should think about which areas will be darker and draw in the scales with thicker lines or a softer, blacker pencil.
You can also add some light shading to help emphasize the shape of the tail.

Step 16 – Add Everything Together
The final step is adding the tail to the rest of your mermaid drawing. Make sure the lines flow naturally.
Use your eraser to remove any unwanted lines and smooth out any curves you need to. Add any final shading that helps give that three-dimensional effect and add any final details you think are required.

Conclusion
We hope you enjoyed drawing a mermaid in this tutorial, and it would be great if you could share the results with us. We are always pleased to see what you have achieved. Use our tutorials to learn to draw a mermaid in as many ways as you can.
Let your imagination run wild with these fantastic mythological creatures.
Always remember to enjoy your drawing. If you are finding a particular stage difficult, don't struggle. Sometimes the best way to finish a drawing can be to stop and take a break.
It is often better to step away than to struggle when you are finding something difficult.
Source: https://brightercraft.com/2021/08/11/easy-step-by-step-mermaid-drawing-tutorial/
0 Response to "Draw Face Easy Steps How to Draw Mermaid Hair"
Post a Comment